Phone & SMS
Purchase a Number
To send and receive phone calls and SMS messages (also used by the Missed-Call Text-Back feature), you’ll need to purchase a telephone number.
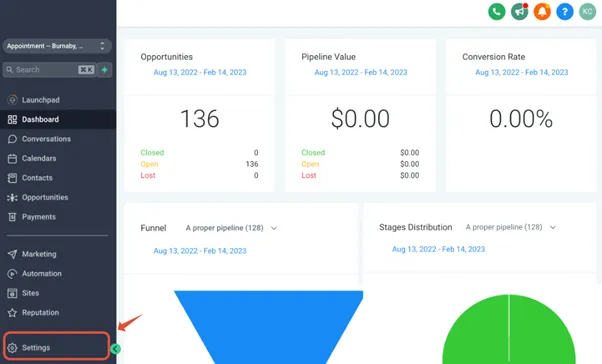
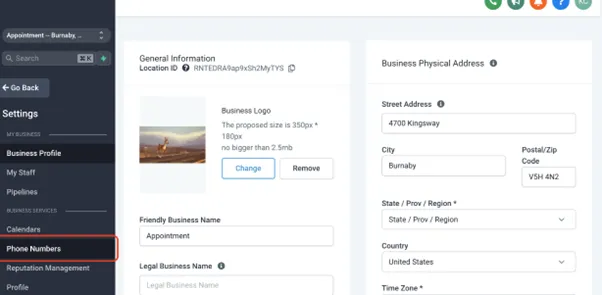
To purchase a number, head over to left-hand side navigation bar:
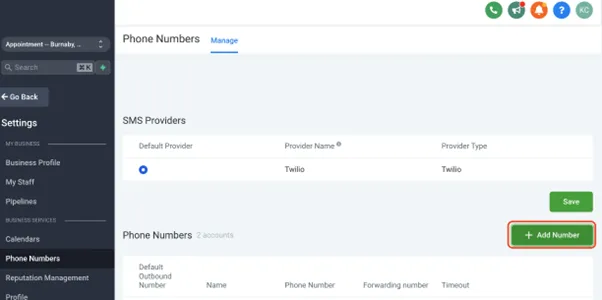
Settings > Phone Numbers > Add Number > Select the Country you want to purchase the number for > (Select SMS and Mobile only from the filter).
Note: There may be specific regulations for individual countries (such as A2P App to person) that need to be fulfilled before you can send SMS messages.
Phone Number Settings
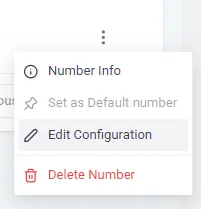
To configure your phone number settings, head over to left-hand side navigation bar:
Settings > Phone Numbers > Select the phone number you wish to edit (pencil icon)
Number Name
The internal name for the phone number (maybe it’s ‘main marketing number,’ or maybe you’ll name it after an employee who will get assigned this number).
Forwarding Number
The phone number to which inbound calls are made to this new number should route (when someone calls the new number you just purchased, the call will be redirected to whatever number you save here).
Pass Called Number As Caller ID
By default, meaning if you leave this box unchecked, the phone number of whoever is calling gets passed along to show in Caller Id. If you check this box, however, the system will pass the number we just purchased as the Caller ID number, which can be helpful as you’ll always know you’re about to answer a call from your app.
Enable Call Connect
If this box is not checked, incoming calls will function as normal so that the call immediately connects when you answer. If you check this box, however, you’ll hear a whisper message prompting you to push a button on your phone to accept the incoming call.
Whisper Message
The Whisper Message controls the message played to the person who answers the call when the Call-Connect features are enabled. So you would put something like “Call from your company name, press a key” so that you know you’re about to hop on a call from the system and that you need to press a key to connect.
Call Recording
The ability to turn on call recording is incredibly powerful as you will not only record the calls, but you will also publish the recording right into the conversation stream of each contact, along with all the emails, text messages, Facebook messages, Instagram DMs, and more! If you turn this on, please be aware that most countries require that you enter a whisper message here, like “this call will be recorded for quality purposes,” so that the caller is aware.
Call Timeouts
Inbound timeout:
The amount of time (in seconds) the system lets the inbound call ring before being dropped or forwarded to a voicemail (personal voicemail or pre-recorded voicemail within the app).
Outbound timeout:
The amount of time (in seconds) the system lets the outbound call ring before dropping the call. Setting a shorter outbound timeout to 30 +/- seconds will reduce your chances of reaching the customer's/leads voicemail. This is ideal if your agents have large lists and only want to speak to readily available leads.
Missed Call Text Back Feature
An incredibly powerful feature called the ‘Missed-Call Text-Back’, which immediately sends a SMS message to any inbound call that goes unanswered.
The Missed-Call Text-Back feature is automatically enabled when you sign up.
To turn off the feature, or make any changes to the SMS message, head over to left-hand side navigation bar:
Settings >
Business Profile >
Missed Call Text Back Widget
To understand how to use custom values in your messaging, read our guide here.
Send a SMS
To send a manual SMS message, head over to the left-hand side navigation bar:
Contacts > Open the Contact Record > In the Conversations window, select the ‘SMS’ option >
Type your message and press send

Please note the number of characters, number of segments and approximate cost of your snippet when sent as an SMS message.
Template SMS (Snippet)
These will apply to SMS and any social media response.
To use a SMS Snippet, head over to the left-hand side navigation bar:
Contacts >
Open the Contact Record >
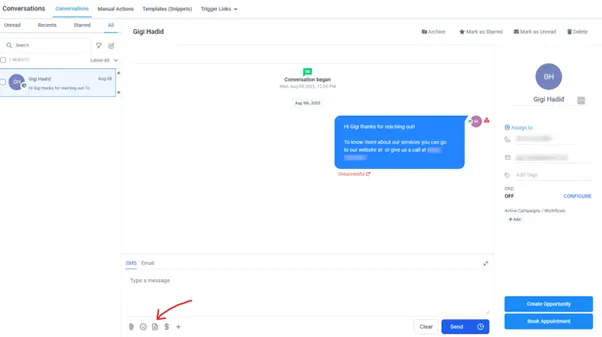
In Conversations window, when sending an SMS message, click on the ‘Insert Snippet’ icon >
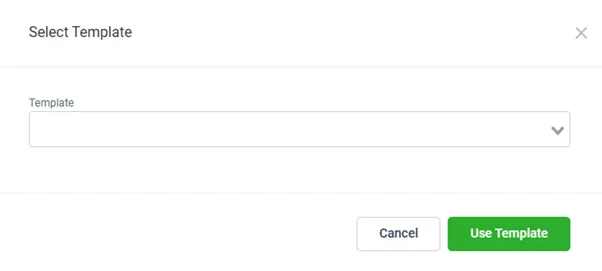
Select the Snippet/Template from the dropdown and click ‘Use Template’ >
It will auto populate the Snippet you composed and now you have the option to add to the message or send it right away by clicking Send.

SMS Templates (Snippets)
Message Templates (Snippets) make it easier for you to respond to a customer by creating responses to FAQs.
Create a SMS Template (Snippet)
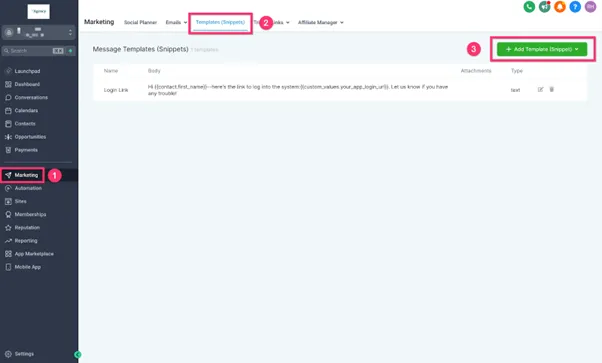
To create a SMS Snippet, head over to the left-hand side navigation bar:
Marketing >
Templates (Snippets) >
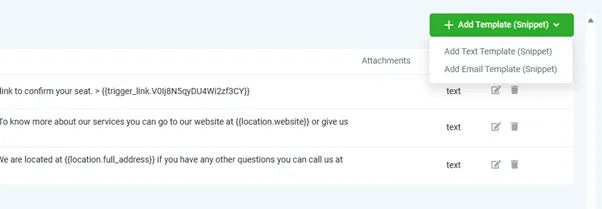
Click ‘Add Template (Snippet)’ button and choose ‘Add Text Template (Snippet)’ >
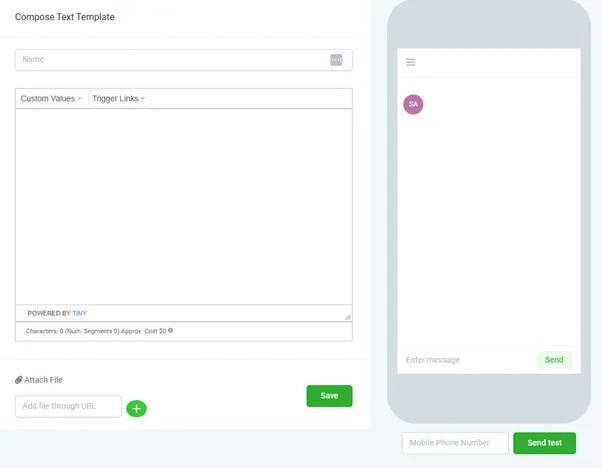
Name the Snippet so it's easier to choose it from the dropdown list from the conversation tab >
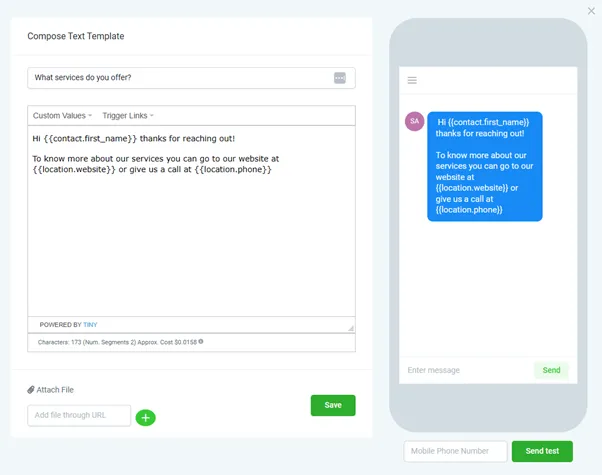
Compose your snippet using Custom Values if needed. The preview on the right shows you what it would look like as an SMS message when viewed on the phone >You can also enter your mobile number and click Send Test to test your snippet.
Please note the number of characters (165), number of segments and approximate cost of your snippet when sent as an SMS message.
