Email Settings
Email marketing is a great way to reach customers and increase sales. But if you're not careful, you could end up in trouble. A dedicated sending domain gives you control over what appears to be coming from your business. That means you can avoid spam filters and other issues that might get your messages caught by unwanted mail servers.
DNS Settings
DNS - Domain Name Servers are normally found in the Control Panel of the company where you purchased your domain (e.g. GoDaddy)
Your DNS settings tells the Internet where to find you and the permissions/authentication settings so that email mailboxes (like AOL, Gmail, Outlook, Yahoo) can tell if your email address is being spoofed. It's a bit like passport control.
The DNS settings will need to be updated for
- Sending emails (and not landing in the junk folder)
- Linking sites/funnels
Authentication for your emails (the passport control bit) are:
- SPF (Sender Policy Framework): tells which mail servers are allowed to send emails for a domain. If an email comes from an allowed server, it's more likely to be genuine.
- DKIM (DomainKeys Identified Mail): adds a digital signature to emails that can be checked using DNS. It's like adding a unique stamp to your letter that proves it's from you.
- DMARC (Domain-based Message Authentication, Reporting, and Conformance): combines SPF and DKIM and tells the email receiver what to do if an email fails these checks. It's like having rules about what to do if the secret code is wrong.
Not setting these up means you're guaranteed to end up in the junk/spam folder
Your app will need to be configured to send emails from a dedicated sub domain (e.g. mail.domain or replies.domain), NOT your primary domain.
A dedicated sending domain allows you to send emails that appear to be coming from your brand, which can help you maintain a better reputation with email services.
By default, all emails sent from our platform will show the name of our email-sending servers in the '
sent on behalf of
' or '
sent via
' email headers.
If you are using a new domain that has never been used for email please make sure to warm up your
domain before emailing to a large list. Failure to do so will results in poor deliverability results.
Send From Settings
You can set up default "From Email Address and Name" for a dedicated domain in your app.
To do this, head over to the left-hand side navigation bar:
Settings > Email Services >
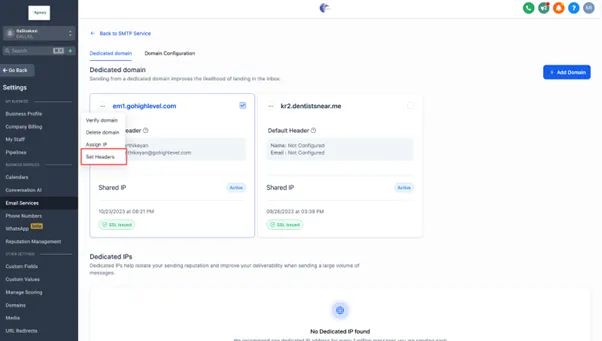
Click on the ‘Dedicated Domain and IP’ button >You will see the domain that has been setup >
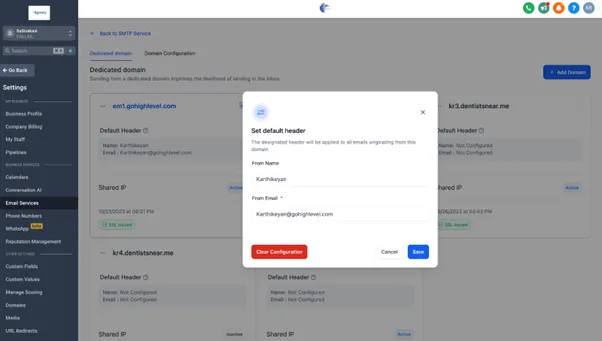
Click on the three dots > Choose ‘Set Headers’ > Enter the From Name and From Email Address.
Don’t forget, for sending the email address needs to be the sub domain (not your primary domain), e.g. ‘@mail.domain' >
Press Save!


The designated header will be applied to all emails sending through the domain.
Outlook & Gmail Sync
You can setup a 2-way email sync between your app and your email account. This will enable all inbound and outbound emails to be stored against a contact in their Conversations tab.
This must be setup PER user.
Send a Manual Email
You can email a contact directly from within the app. To send a manual email, head over to the left-hand side navigation bar:
Contacts >
Open the Contact Record >
In the Conversations window, select the ‘Email’ option >
Type your message and press send.

Automated Email Sequences

Email Templates
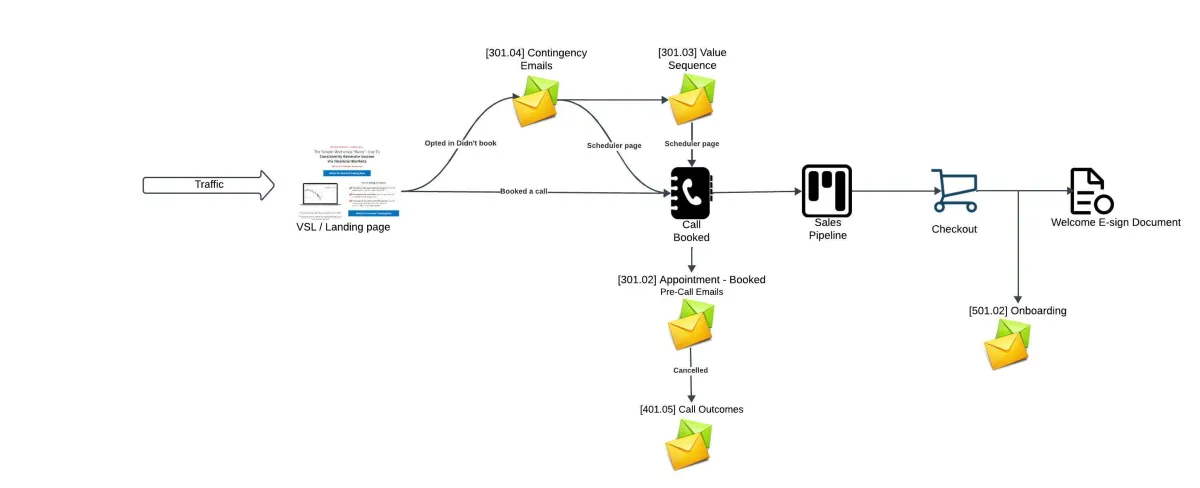
The email templates are already configured in the automated workflows for
[301.04] Contingency Emails - waits 40 minutes for the contact to watch the VSL and book
[301.03] Value Sequence - Will send if they still don't book
[301.02] Appointment - Booked (pre call emails)
[401.05] Call Outcomes (Rebook request)
[501.02] Onboarding (post sale)
To update an email template (image, video or text), head over to the left-hand side navigation bar:
Marketing > Emails > Templates >
Click into the folder and then the email you want to update.
Don’t forget to press Save!

Any updates to custom values or trigger links with the email copy will cause the automation to fail.
Please do not update these; instead use our support form and we can do this for you.
Email Broadcast Campaigns
An email campaign/broadcast is an email message you design and send to your specific contacts or a smart list.
After you select a template, you'll design your campaign on top of the template layout. In Email Builder, you can duplicate, delete, and rearrange different types of element blocks quickly.
To create an email broadcast campaign, head over to the left-hand side navigation bar:
Marketing > Emails > Campaigns > Click ‘Create Campaign >
Select the email template which you would like to create a Marketing Email Campaign >
There is a preview option to check the template >
Now it will take you to the builder, where you'll design your content and place the necessary elements for campaigns.
You need to click on Send or Schedule when done
Pre-sending Checklist
- Add your recipients in the To section by choosing email(s) or smart list(s)
- Add your email address in the From section (make sure you use your subdomain for sending)
- Add your name in the Name section (optional)
- Add your subject line in the Subject section
- Add your Preview text in the Preview section (optional)
There will be an option to delete or reschedule the email campaign. If the user wants to reschedule the campaign, they can click reschedule and set the date time of the campaign. The reschedule will not be allowed before one hour of sending.
For example, if the schedule date is 11 AM EST, it will not allow you to reschedule until 10 AM EST.