Contacts
Add a Contact
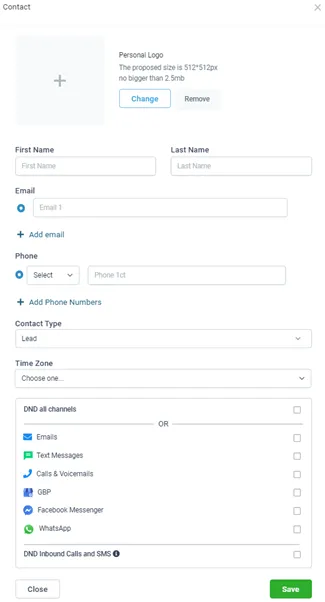
Manual Add
Contacts that come in from webforms and social media platforms are being automatically added to the system. You can also manually add a contact at any time by heading over to the left-hand side navigation bar:
Contacts >
Click on the ‘+’ icon >

Complete the contact record and press Save.

Importing Contacts
You can bulk import a list of contacts for ease, by heading over to the left-hand side navigation bar:
Contacts >
Click on the upload icon’ >

Follow the on-screen prompts to upload your contacts list.

Here are some key steps to take before importing:
- Only users with an 'Admin' role will have the option to import and export contacts.
- The import file needs to be a .csv file.
- Have only one sheet/tab within the spreadsheet.
- Be smaller than 50MB (Note: a typical .csv file with 4 columns and 10,000 records will be ~500kb in size).
- The first row should NOT be blank! Include a header row in which at least one column header corresponds to a field in the system.
- It's always best practice to clean your list and check for duplicates before importing into any software, especially if you are running cold traffic campaigns. Failure to do so can result in deliverability issues.
Merge a Contact
If you have a duplicate contact, you can merge their records together by heading over to the left-hand side navigation bar:
Contacts >
Use the search field to find the contacts >
Tick the checkbox next to the affected contact records >

Click on the ‘Merge Contacts’ Icon >

The system will fetch all contact details relating to those contact records for comparison.
The Master Record will appear on the left, with all fields selected. You can now select the relevant information you wish to keep from the other contact records to overwrite the Master Record:

Delete a Contact
You can delete a contact by heading over to the left-hand side navigation bar:
Contacts >
Select or search for the contact(s) you wish to delete >
Tick the checkbox next to the affected contact records >
Select the ‘Delete’ Icon.

Smart Lists
Smart Lists are innovative contact lists that allow users to customise and filter contacts based on specific conditions, such as custom fields. You can select which columns to display, and the Smart Lists update in real-time as contact data changes.
For example, if you have a contact list for an email campaign, a Smart List could automatically update to include new contacts that meet the criteria you've specified since the campaign was first created. This allows for real-time, automated updates to your contact lists, making them "smart."
These lists can be filtered based on various conditions, allowing you to segment your contacts in the most relevant way to your needs. You can also choose which data columns to display, giving you a customised view of your contact information.
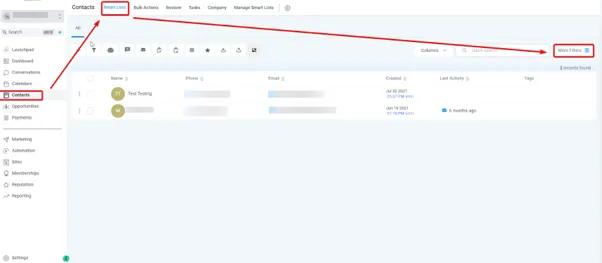
To set up a smart list, head over to the left-hand side navigation bar:
Contacts >
Smart Lists >
More Filters

Pick one or multiple filters from the dropdown menu on the right side of your screen >
After choosing a filter, input the necessary details and click “Save” to secure your filter >
To add more filters, select the “AND” option >
To permanently save your filter(s) as a list, click “Save as smart list” at the bottom of your screen >
Now your smart lists will appear at the top of your ‘Contacts’ tab view.

Do Not Disturb (DND)
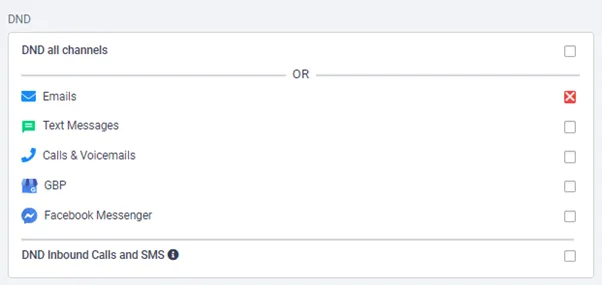
The DND (Do Not Disturb) function permits you to retain Contact details whilst respecting their communication preferences. In some cases, Contacts may opt-out of certain communications but you may still want to keep their information. You can choose to enable or disable DND manually for specific communication channels or all channels within your system based on a Contact’s preferences.
By using the DND feature, you can avoid annoying your contacts who don’t wish to be disturbed and keep their information in your records. Additionally, respecting your contact’s communication preferences may reduce the chance of your emails or SMS communications being marked as spam. This will help your future communications from your system to run smoothly.
To enable or disable the DND feature, you can do it manually for a contact or allow them to self-enable it by unsubscribing.
To do this manually, head over to the left-hand side navigation bar:
Contacts >
Select or search for the contact(s) you wish to delete >
Click into the contact record >
Scroll down on the left window to ‘DND’ >
Select or deselect as you wish.
